

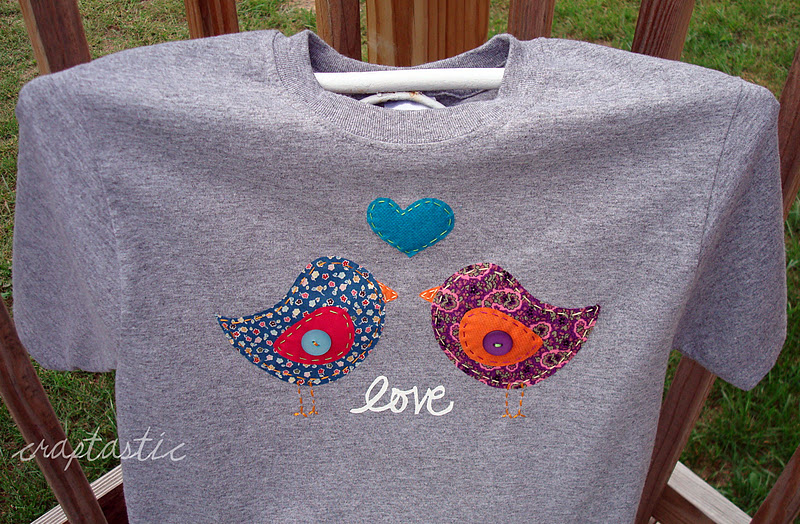
Last week I showed you all an adorable t-shirt from the store Altar'd State that I was smitten with! I finished my version of it this weekend!
It was so easy to do! Here's how!
Start by picking out six different fabrics. Choose different colors for the bird bodies, wings, beaks, and one heart.
Iron on a sewable, fusible interfacing on the wrong side of each of these fabrics. You don't need very large pieces of fabric for any of these.

1. Once your fusible interfacing is ironed on, cut out the bodies for the two birds, the two wings, the two beaks, and the heart. 2. Iron on the heart first. Be sure this is centered. 3. Next, figure out where the beak will need to go for the birds, and iron this on. 4. Iron on the body of the bird over the beaks, then iron on the wings.
After my pieces were ironed on I used a contrasting thread color to stitch around the body, wing, beak, and heart. This adds some texture to the birdies and helps keep them on! If you're talented enough you can use a sewing machine for this part. I'm not good at anything except straight lines, so I hand stitched!
I added one button over each wing - again, I just hand stitched.
This is the 'love' stencil I used. I just googled 'love, cursive' and browsed until I found something I liked.


1. I simply placed my freezer paper right on top of my laptop to trace the stencil. There is a rough side, and a smooth side on the freezer paper. You should be tracing on the smooth side. 2. This is what it will look like after you trace your stencil with permanent marker. I used an exacto knife to cut it out. Don't forget to save the little pieces that you cut out of the l, o, and e! 3. Iron on the main stencil where you want the word to be. 4. Now iron on the little pieces that you cut out so you'll have a complete word!

I used white fabric paint for my word. Make sure to apply a very thin layer of paint at a time, trying to keep the paint brush straight up and down. This will help prevent the fabric paint from seeping underneath the freezer paper stencil. You can see my Harry Potter T-shirt to see what happens when you apply a thick blob of paint! Not pretty! Don't cringe too hard at the horrible photos! ;)
Don't forget to put cardboard or a thick piece of paper underneath where you're painting. You don't want it to bleed through to the back of the shirt!

This is my stencil after two light coats of fabric paint. I painted on four coats in total!
Now rip off that freezer paper before the paint dries! You can use your exacto knife to help peel off the tiny pieces.
Let it dry, and you're done!!
Stitching detail:

Love stencil detail:

Here you can see Altar'd State's version above, and mine below!

This shirt only took me a few hours to finish! The longest part was doing the hand stitching. If you catch the shirts while they're on sale at Joann Fabric or Michaels they're only about $2.50. This is a good project to use up fabric scraps on. The buttons were about $2.50. I had everything else, so this shirt was less than $5.00! Much nicer than the almost $30 price of the original!
Just be sure to wash this shirt inside out!
Cheers!


Love it! Very cute!
ReplyDeleteGreat Knock-off! I pinned it!
ReplyDeletekatie, that is so stinkin cute! love it!
ReplyDeleteSo cute. The love birds are adorable! You did a great job!
ReplyDeleteThose lil' chicks are so sweet! Darling tee. Love it =) What a crafty girl you are. My goodness.
ReplyDeleteIt's adorable! I wish my girl was a bit more girly so I would have a reason to make one too.
ReplyDeleteyou always have such great ideas !!
ReplyDeleteI love everything about it. I make chicks on a stick every year (I made them crows last Halloween). I dig little birdies - shared it on FB!
ReplyDeleteI love this, Katie!!!
ReplyDeleteI featured you on {Crazy Blessed Love} Friday Features! Come grab a button!
very cute, love it!
ReplyDeleteOh I love this!! How wonderful!!
ReplyDeleteEsther.
I love this idea! I'm going to mark this post and hopefully make this! ♥
ReplyDeleteOh gosh, so flippin cute!
ReplyDeleteYours turned out even better than the other one!
I love all things birds. If you have a moment, I'd love for you to link up: http://trophyw.blogspot.com/2011/10/linky-12-will-craft-for-fun.html
ReplyDeleteYou always find ways to make the cutest stuff! This is adorable. :)
ReplyDeleteGabby
The...Late, Young Family
Very cute!
ReplyDeleteJenny
www.simcoestreet.blogspot.com
These shirts are SOOOOO cute! Love them!
ReplyDeleteWonderful idea!
ReplyDelete~Mrs. Delightful
Ourdelightfulhome.blogspot.com
I like your birdies the best! So cute.
ReplyDeleteOh this is fabulous, I had to pin this on pinterest!
ReplyDeleteI like yours better than the stores :)
soooo cute! I want a little girl. I would make all of her clothes! My oldest son refuses to wear anything I make..."he's a man," after-all...sheesh.
ReplyDeleteThis is adorable! I thought I was nuts for tracing right from my computer screen, LOL! But hey, whatever works, right? Would love it if you would link this up to our Rockin' link party going on now at RoCa and Company. Here is the link: http://rocaandcompany.blogspot.com/2011/10/you-rock-6.html. Come and show off what you got. Hope to see you there...
ReplyDeleteRemember...YOU ROCK!!
Carmen @ RoCa and Company
www.rocaandcompany.blogspot.com
Too Tweet!! So glad you linked up to the Tuesday To Do Party!
ReplyDeleteSmiles!
Jami
www.blackberryvine.blogspot.com
This is so cute! I featured this on my blog tonight. Thanks so much for linking up to Your Whims Wednesday! Come check it out and grab a button :) http://mygirlishwhims.blogspot.com/2011/10/your-whims-wednesday-30-and-features.html
ReplyDeleteKatie, this shirt is adorable! :) You did a great tute, but I'll never make one! hahaha don't like sewing of any sort. :)
ReplyDeletecatching you
gail
That is the sweetest shirt ever, Katie! Thanks for sharing with air your laundry Friday!
ReplyDelete色情美女視頻聊天網站
ReplyDelete美女裸體免費聊天網站
免費女主播聊天室
Q臺妹-真人摳逼裸聊
國外免費開放裸聊室
免費進入裸聊室
免費夫妻視頻真人秀
免費進入主播裸聊室
裸聊直播間免費
免費同城交友裸聊室