Image Map

Sunday, June 19, 2011

Bird is the Word!


As I'm sure you know by now, I love birdies and owls!  When I was buying the fabric at Jo-Ann to make my Summer wreath I passed by a cart full of gorgeous, bright fabrics!  I thought they would all look beautiful on a chair and I was ecstatic when I found a pair at an antique store.  Actually, I found one chair and my friend found the partner.

Once I brought the chairs home and began to remove the fabric I found another layer of fabric below.  This photo shows the top layer on the right, and the original fabric on the left.


The original fabric actually had a beautiful design on it - I dont' know why someone covered it with the horrid fabric they chose.  But, it wasn't my color and I am completely grossed out by old fabric, so I threw it all away! Uck! 

After I removed the seats I gave the chairs a good hand sanding then cleaned them real well.  I began hand painting a coat of white paint.  I soon discovered that 1) This was going to take an eternity and 2) The wood was beginning to bleed through.  So I make a quick trip to Lowe's and bought some spray paint primer and flat Valspar white spray paint.  That did the job!

Next chore was the seat.  I threw out the old cushioning - it practically crumbled in my hand when I took it off! Gross!  For the cushion I just used a mattress topper I had.  I layed the seats down and traced with a sharpie, then cut it out.  I did this twice to ensure the seat would be double thick and comfortable!


Then I layered on the batting, followed by the fabric.


The fabric is Dwell Studio for Robert Allen Home, Botany Flora, Hydrangea.  I got it at Jo-Ann Fabric.  It's thick and durable, but still comfortable to sit on.  Here they are all finished!

It has done nothing but rain for about 5 days (which we needed) so it was difficult to get real good photos.  I had a few minutes of moderate light so I had to run out on the patio before it began to rain again.


I love the chunky legs! So cute!


Here is a close-up of the fabric - see the sweet birdies!


I was going to post them on Craigslist, but I sold them before I could! None other than Ms. Mandy J purchased them!  Here they are in her foyer (excuse the bad photo - I left my camera at home and had to use my phone camera). The orange isn't quite as dark as it appears in these photos - the chairs looked PERFECT with the shade of orange!


And, as promised, here are some photos of her desk in her office. Again, excuse the poor photo quality! 


She painted this chair herself - it has crazy splatters of orange all over it (from her wall colors) - isn't it so funky! I think it looks great with her desk!


Lastly, here is my favorite part of her entire house!


Sigh - isn't that a gorgeous door!

Cheers!

Keeping It SimpleBoogieboard CottageDomestically SpeakingAnything RelatedTuesday To Do PartyPhotobucketmommahenscoopPhotobucketSomewhat Simple Catch a Glimpse ButtonTransformation ThursdayHookingupwithHoHSuzy's Artsy Craftsy SitcomPhotobucketFurniture Feature Fridaysfreckled laundryThe Shabby Nestbutton+FTF.jpgDesigner GardenThe DIY Show OffUndertheTableandDreamingPhotobucketPhotobucket36th Avenue504 Main

Monday, June 13, 2011

A Mistake, A Tip on Comments, and A Question!

Hi All!! Hope you're having a great Monday!

First, I wanted to point out a paint mistake I made in my last post on the retro green desk!
 
(Paint color Palm Leaf by Valspar)

I told you the paint color was Bayleaf by Valspar - it is actually PALM leaf!!

Sorry! I sent the paint can home with Mandy J and thought I remembered the paint color correctly.

Ok - SECOND, all my comment-leaving problems have been fixed!!  I know a lot of you have been having problems leaving comments.  This has been making me so angry - I've even resorted to e-mailing a few people my comments! =)
(Grrrr!!)

I had heard you could download Mozilla as your internet browser, but I didn't want to do that.  I have enough junk on my PC already.  Then I read this post from Bonnie @ Pink Stitches! It changed my life! Haha, ok.  Not really, but now I can communicate with my blogging buddies again, and for that I'm thankful!

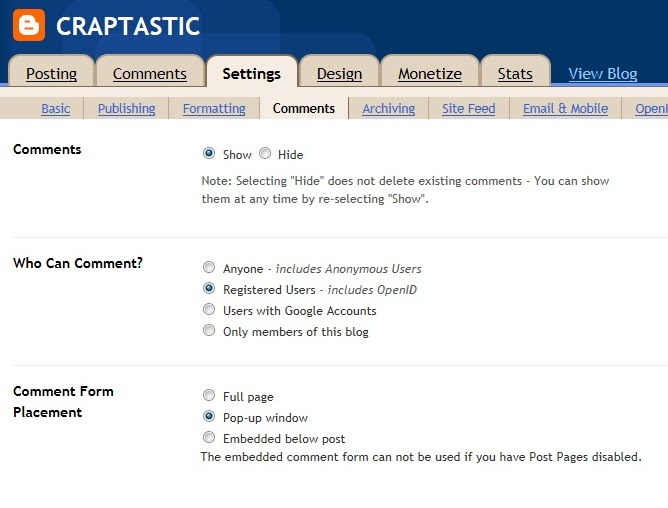
Tip #1 - I only had issues leaving comments with blogs that had their comment section embedded in the post.  If you think you have been receiving fewer comments, check your comment format.  Select comments to appear as either a full page, or a pop-up window (that's what I use). This should make it easier for folks to comment on your posts!

Tip #2 - For embedded comments - when you leave your comment you have multiple options as to how you wish to be identified. If the blog has it available (not all do) you can choose to comment as Name/URL.  It takes a second to type your name and blog address, but you can comment!

Tip #3 - For embedded comments - lastly, like I mentioned above, not all blogs have the Name/URL option available.  But don't worry!  If you are google like me, just select to sign in with your google profile. 

In the past, this would result in me jumping back and forth between the blog's comment section and the blogger sign-in page over and over.  The secret is to not keep your self signed in (see picture below).


Just de-select the "Stay signed in" box under your password.  Don't ask me why, but it works!! 

So far **fingers crossed** I've been able to comment on everyone's blogs again! Hooray!!

If you've stuck around this long thanks! My last question is simple:

Where do you get your furniture to refinish??

The goodwill here SUCKS! I always get so jealous at the super finds people make at their Goodwill!

My go-to source is usually Craigslist, but lately I've been having poor luck.  Either people won't return my e-mails or they tell me to call and schedule a pick-up time then don't answer their phone.  Grr!

I even had a woman last week tell me to meet her at 1:45.  I got out of school early and showed up around 1:15.  She had just sold the desk I was coming to get! WHAT?! Her excuse was "well, you never know if people are going to show up or not."  At least give the chance to show up before you write me off! Needless to say I was furious and there was discussion of kicking her big porcelain fairy.  **No porcelain fairies were harmed**  But joking around about it made me feel a little better!

So, I'm just curious where I should go for furniture and would love to hear all of your secrets!!

Cheers!

Saturday, June 11, 2011

Who You Gonna Call.....


GHOSTBUSTERS!

I know what you're thinking.  How is that related to this desk?  Well, when I first started painting this little lady, the paint was lime green, like Slimer from Ghostbusters. Pretty intense.  So everytime I see this pretty lady I think of Ghostbusters.  See, it makes sense now! =)

So, this little lady was a custom job for one of my pals, Mandy J, who just bought her first home! What's funny is that even though she has antiques galore in her house, there is only ONE item that is older than her home! Yeah, her home is ancient! But super cool!

You'll probably remember from awhile back when I mentioned this desk.  Here is the before:


This desk screamed Mandy - it matches her personality perfectly!

When I got the desk home I realized the veneer was chipping all along the bottom.  Being the genius I am I thought "Oh, it'll be easier to just strip the veneer than it would to glue every little piece." Hahaha - silly me.  I shoulda just glued.

But, I found some cool tips that help speed up the veneer removing process (nothing makes it easy).

Use an iron (please go buy a super cheap one - don't use your legit iron like I did), a moderately damp cloth, and a sharp scraper.

Put your iron on the hottest setting possible.  Dump your cloth into a water bucket (I kept one by me for the whole process) then moderately ring it out.  You don't want it dripping, but you don't want it just damp.  This cloth will create the steam necessary to help remove the veneer.

Place your moistened cloth on top of the section you want to remove.  It's best to find a section where the veneer is already peeling and start there.


Run your iron back and forth for about 30 seconds.  It help dissolve the glue much better than if you do it for a short amount of time.  Once you've run the iron long enough to create a decent amount of steam, remove your cloth and get ready to strip (the veneer, not your clothes)!


At this point I was still using my putty knife, but my super-awesome hubby knew I was distressed, so he ran to the store and bought me a strong, sharp scraper.  Anyways, place your scraper under the strip you want to remove and work it up until it won't scrape anymore (you can hit the end of your tool with a hammer if you're like me and have no upper body strength).

It should come off like this:


I would just hack away at that strip, throw it on the floor, then start the process again.  This took FOREVER! I will never do anything that requires stripping veneer again.  It's not my cup of tea.

I should note though, that the above process works best for desk not made in the last 40-50 years.  Newer furniture uses a different type of glue to adhere the veneer - fortunately this desk was made in the 40s with the glue that does not hold up well to heat and moisture. 

I waited 24 hours for the surface to completely dry and sanded down the entire piece - I did a once over with 80 grit, then once again with 220.

In total, I used two coats of paint. I think it was Valspar's Palm Leaf.  It went on GREAT! I think I made record time for painting this desk.  After it dried for about three days I brought it inside and put on a coat of wax!  And here's Slimer:


 It looks so retro! I love it!


 It's hard to tell in the photos, but this desk is DEEP!  At least 1 foot deeper than your average desk! It makes a great laundry folding table! ;)


 The green actually looked great with the original wood color - but the top was too far damged to strip and stain. Another fun tidbit - I used wall spackle to fill in the holes instead of wood filler!


 This is the first desk I've ever done with these slide-out trays. They're awesome!


Close-up! Isn't she great! It looks awesome in Mandy J's house - she has old hardwood floors and ORANGE walls! I'll get some photos of it soon!

Cheers!


mommahenscoop


Saturday, June 4, 2011

Big Blue Birdie Love


I hope you all are enjoying your weekend! It is H*O*T here! It hit 98 degrees yesterday while I was out antiquing!  Summer is offensive to multiple senses - you practically melt when you're outside, but then you freeze to death when you're inside!  You smell like BO outdoors only to come in and smell like a wet dog.  Don't worry, I do take showers! ;)

Anywho! I've had this sweet little birdie resting on my living room dresser for awhile now.  I bought it from Hobby Lobby last year to go on my old purple dresser.  But now I have a completely different style chevron dresser.  So little birdie needed an update!

Here she is before (Yes, it's a she.  I checked). 


I used my free Valspar sample, Bayside.  Here she is after three coats.


I coated her with a sloppy layer of Valspar antiquing glaze.  I just used a foam brush then threw it away afterwards.


I had a moderately damp rag that I wiped over the entire bird after the glaze was applied.  I didn't want the glaze to be too overpowering, so I wiped off the glaze immediately before it could dry on too much.  I just left it in all the natural details.


"Nothing going on here - just a birdie hanging out on the porch!"


Isn't she so sweet?


This wouldn't be a Katie post without a blurry close-up!


Now she's sitting on the "new" table I bought at an antique store yesterday! What? Yes, I bought a refinished piece. It was weird, but I adore it on my back porch!


Doesn't she look so sweet with the yellow and white?  Don't you mind that green wall in the background.  I'm thinking ahead.  In a few years I'll be in a new house with new wall colors.  Things may just look weird around here for awhile! ;)

Here's a sneak peek at a faboo makeover I finished this weekend! You'll get to see the full reveal next weekend!