

I know I already posted once today but I was just too excited to wait!!
A few weeks ago I posted photos of my DIY knockoff pillows. I asked you all to let me know if you wanted a tutorial for the striped Target knockoff pillow! Man, you folks wanted a tutorial!! So here you go!
**WARNING**
There are tons of photos and this is a lengthy post! Just saying!
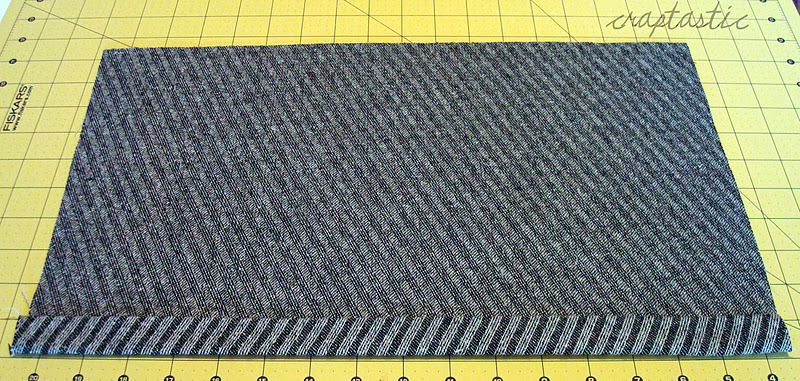
For a 16x16 pillow cover you will need:
17x17 piece of fabric for the front
17x25 piece of fabric for the back
6 strips of fabric 2 inches wide (they will be as long as the fabric you use, I think mine were around 44 inches - this will vary for every fabric)
For those of you with a good eye, yes, there are ten strips of fabric in my photo. I wasn't sure how many I would need! :)

Always start by ironing your fabric so it is pretty and flat! Just as a side note, did you know sometimes you can get lucky and score fabric at Goodwill? The fabric used for the main body of this pillowcase was $2 for 2 yards! SCORE!
The fabric used for the strips was the cheapest solid white fabric I could find at Joann Fabric. It was $1.99/yard. I bought 10 yards and used my 50% coupon, so I paid $1/yard.
Back to the pillow!
Take your piece of fabric for the back that is 17x25 and cut it in half on the long side. Now you should have two pieces that are 17x12.5.

On the side that is 17 inches, fold over 1/4 inch and press, then fold over another 1/4 inch and press again. Do this for both pieces. This is how it should look now.
Stitch along your fold to secure it. You can use one row of stitches, but I like to stitch two rows. I also like to use contrasting thread for a fun pop of color!
Set these pieces aside. They will be used for the envelope closure on the back of the pillow cover.

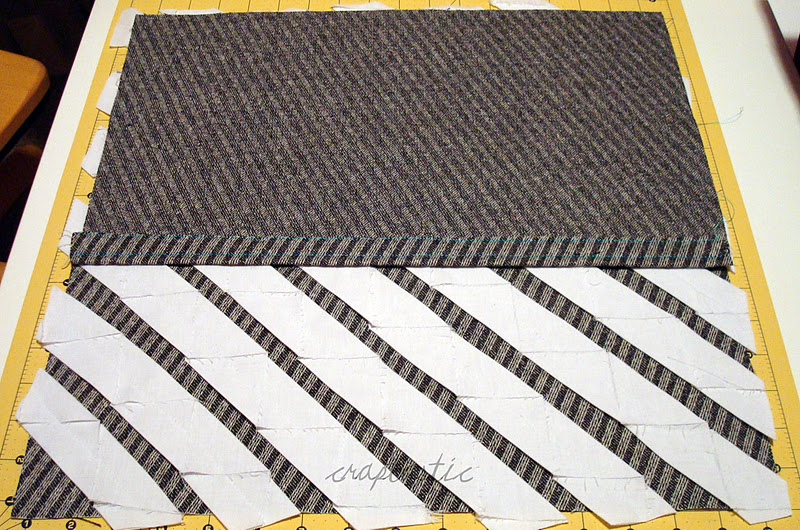
Now we're ready for the stripes. Make sure your iron is set at the highest level with full steam. This makes the folds remain better.
Lay down your 2 inch strip and fold over the edge to form a triangle.

Grab the excess end of your strip and lift it up.

Fold it away from you so that the left edge of the strip meets with the right edge of the triangle you just formed.

Press with your iron to make a neat fold.

Repeat this process in the opposite direction. Lift your excess strip and fold it towards you.

Fold it so the left edge of your excess strip meets with the right edge of the triangle you just formed. Press with your iron.

Repeat this process until you reach the end of you strip, then complete the remaining five strips.
As you finish a strip, lay it down on the right side of your 17x17 piece of fabric.

As you move further from the center you will notice you have excess strip hanging over the edge. Trim this excess and use it for the smaller strips.

This is how your pillow cover should look right now with the strips on. Rearrange them as close together or as far apart as you wish. You can also lay the strips down horizontal. I like mine diagonal!

Pin your strips in place!

Sew a straight line down the center of each strip. You can use the same color stitching or a contrasting color! I chose to use the same color.
Stitch very slowly so the edges of the strips don't flip up and get folded under while you stitch.

Due to the type of fabric I used for the main body of the pillowcase, I had to use a tighter tension stitch. This caused the strips to billow up a little bit. No biggie, I just pressed with my iron again. If you like this look, you could just leave it!

YOU'RE ALMOST DONE!
Lay your 17x17 piece RIGHT SIDE UP. Out of the two 17x12.5 pieces, choose the one that had straighter stitching on the edge. Lay this piece RIGHT SIDE DOWN so the raw edges meet the raw edges of the large piece.
Lay down your remaining 17x12.5 piece RIGHT SIDE DOWN again, so the raw edges meet the raw edges of the large piece.

Pin in place and sew one continuous stitch around all four edges. Don't forget to backstitch at the beginning and end!! Trim away the excess and trim your corners.

After you flip your pillow case right side out press it with your iron one more time! Trim away any crazy strings on the strips and you're done!

This is how your envelope closure should look.

Close-up of the contrast stitching.

Now admire you handi-work!

Detail of the stripes. You can see there is still some fraying on the edge. I like it! If you want to prevent this use 3 inch strips of fabric and fold over and stitch the ends before you begin.
*Update* After I wrote this I had a thought - because of the way you fold the strips, simply sewing the edges over to prevent fraying wouldn't work. You could use a 5 inch strip, fold in right sides together and sew the edge. Then flip it right side out and press. You would still see a seam every other fold, but I think that would just add more texture!

(Giveaway is now closed)
Now for the giveaway!
I'm giving one of YOU a chance to win this fun pillow cover!!
All you have to do to win is leave me a comment!
**Please note that this giveaway is only for GFC followers and US residents (sorry international pals, I'm too poor to ship overseas right now)!**
The giveaway will remain open until 12:00 midnight CST on Saturday, November 5th.
I will announce the winner Sunday, November 6th!
If you want to comment but aren't interested in the giveaway just leave me a love note and I won't include you in the count!
Hope you all have an awesome Halloween!
Cheers!


Yay! I want! I want! This one is fabulous! Great tutorial :-)
ReplyDeleteSuper Cute! Thanks so much for the tutorial...even though winning it would be so much better! HAHA!
ReplyDeleteThank you for the tutorial! Love this look! My couch is definitely in need of some new pillows
ReplyDeleteI wouldn't mind taking it off your hands! :)
ReplyDeleteI love it!! This would make an awesome prize. :)
ReplyDeleteAwesome tutorial too, I may give this a shot!!
i appreciate the tutorial but i am lazy when it comes to sewing.... so you should pick me to win! ;) thanks fot the chance, katie!
ReplyDeleteThat pillow is adorable and thanks for the tutorial I might just have to try that out. Not a very good sewer though.
ReplyDeleteI can't wait to make one for my apartment! I love the texture and possibilities. =)
ReplyDeleteI think you did a great job on the pillow. It looks fantastic. (Count me out of the giveaway, though. I'm downsizing.) Thanks for the giveaway offer.
ReplyDeleteYea! So sweet of you to do this giveaway! I love the pillow, I don't have a sewing machine, but hopefully someday I'll be able to get one & learn how to sew.
ReplyDeleteBeautiful!!! I would love to have this!!
ReplyDeleteThat was a great tutorial! WOW, a giveaway of this pillow would be so fun to win! Thanks!
ReplyDeleteKatie!!! Stumbled across your blog and I'm your newest follower. I'd LOVE to win the giveaway.
ReplyDeleteStop by some time...
www.atobeingcreations.com
I love all of your creations, so of course I would like to enter the giveaway for this pillow cover!!!
ReplyDeleteGabby
The...Late, Young Family
lateyoungfamily@gmail.com
I like this detail! The oclor and fabric combinations is really pretty too.
ReplyDeleteOMG....I just paid someone to teach me how to do this!! Oh well. I like your way better :-) TFS,
ReplyDeleteYou did a wonderful job!!! I would love it if you would stop by and link this up to my linky party going on right now :)
ReplyDeletehttp://everything-underthemoon.blogspot.com/2011/11/bedazzle-me-monday-7_6572.html
Also, make sure you check out Random Act of Kindess Week. I'd love to see you be a part of it!!
http://everything-underthemoon.blogspot.com/2011/11/kindness-and-thanksgiving.html
This pillow looks great! Thanks for sharing this tut:)
ReplyDeleteGreat tute and pillow! Thanks for sharing it all at the Tuesday To Do Party!
ReplyDeleteSmiles!
Jami
www.blackberryvine.blogspot.com
I would love to feature this on Knock Off Decor. Can you email me at knockoffdecor@gmail.com so I can talk with you about it?
ReplyDeleteThank you for the tutorial! Love this look! My couch is definitely in need of some new pillows
ReplyDeleteI should say only that its awesome! The blog is informational and always produce amazing things. Feel free to visit my website; 바카라
ReplyDeleteI would appreciate you that you pick up an important topic to write a thoroughly informative post on. I hope that you never stop and keep posting such valuable content 온라인카지노
ReplyDeleteI will recommend your website to everyone. You have a very good gloss. Write more high-quality articles. I support you. 온라인카지노
ReplyDelete토토사이트 What’s up, yes this paragraph is really good and I have learned lot of things from it concerning blogging.
ReplyDeletethanks.
I’m really enjoying the design and layout of your website.
ReplyDeleteIt’s a very easy on the eyes which makes it much more pleasant for me to come
here and visit more often. Did you hire out a developer to create your theme?
Exceptional work!
스포츠토토
Hi there, 바카라사이트 I found your blog by the use of Google while looking for a related subject,
ReplyDeleteyour site came up, it appears good. I've bookmarked it in my google bookmarks.
That is a very good tip particularly to those new to
ReplyDeletethe blogosphere. Brief but very accurate information… Thanks for sharing
this one. A must read post!
바카라사이트
사설토토